Polymer clay cat tutorial – DIY step by step tutorial
Below it’s an easy polymer clay Halloween black cat tutorial that will help you decorate your home in a very cheap and innovative way! You can also create this cat in a smaller size and use it as a brooch. I bet you have in your group of friends a cat lover that will enjoy such a gift.
Things you will need for this Polymer clay cat tutorial:
– black, orange and yellow polymer clay
– needle modeling tool or toothpick
Process:
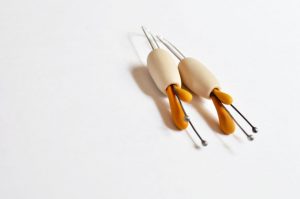
We will first create the front legs (figure one): two long cones. With the needle modeling tool we’ll create the claws.
Then we will create the figures from the second image: the head (a ball), the body (a larger cone), the tail ( a very thin cone or a sausage) and then the back legs( in the form of an hourglass). Next we’ll work a little more to the back legs. Use the third image from the first row to adjust them and then combine the body with the legs and the tail as shown in the first image from the second row. Use a toothpick in the body to fix the head.
As the next step we will be modeling the head of out polymer clay Halloween black cat. Create two holes and fill them with yellow clay. Then add a thin dash of black to create the spooky effect. Add in the middle a small orange triangle (that’s the nose). We have to add two more triangles, this time black ones. Those will be the ears of our clay cat.
Attach the head to the body. Congrats, you have just created your first polymer clay Halloween black cat.

I hope you enjoyed this polymer clay Halloween black cat tutorial. I got it from here. If you are planing to create your own Halloween decorations, here is a nice and simple tutorial that will help you.
Don’t forget to follow my Pinterest page to get captivating polymer clay new ideas and free step by step DIY tutorials.
######