Polymer clay Seahorse – DIY step by step tutorial

Polymer clay Seahorse - DIY step by step tutorial

Today I decided to share with you my passion for the sea with this Polymer clay Seahorse DIY step by step tutorial. Ever since I was a child I was always fascinated about the sea and the sea creatures, especially the seahorses which are so majestic and intriguingly beautiful. I have always viewed them as little unicorns from the sea.

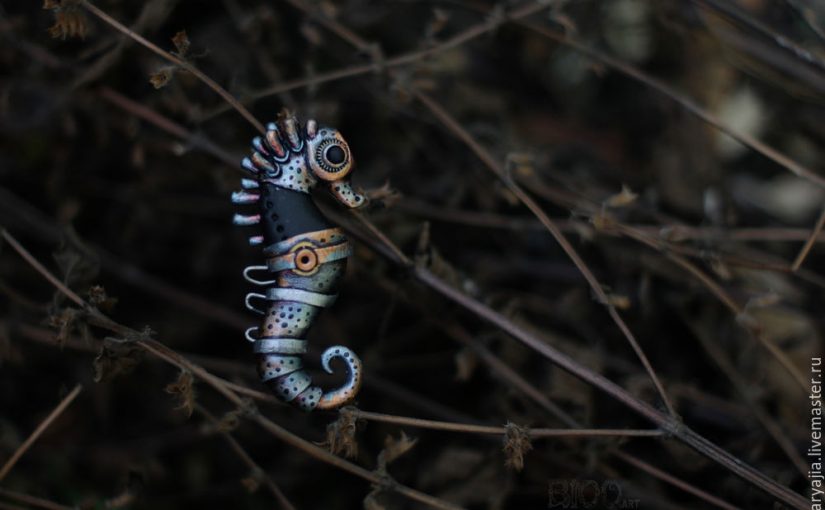
To add some uniqueness to our seahorse we will use some biomechanical details. This Polymer clay Seahorse DIY step by step tutorial will definitely enrich your creativity.

For this Polymer clay Seahorse DIY step by step tutorial we need the following:

Polymer clay – the color of your choice – I recommend black or any dark color.
Basic tools – scalpel, a pair of knitting needles of different sizes, a needle, a toothpick, synthetic brushes.
Acrylic paint.
Metallic wire for the ridge on the back.
Small gears.


Polymer clay Seahorse - DIY step by step tutorial

Let’s get to it!

Start by forming a medium cone out of the clay. Try to shape the seahorse body as you can see in the image above using your tools. Look at a picture with an actual seahorse or the final one from this tutorial. This will help you get a better form.

Polymer clay Seahorse - DIY step by step tutorial

For the next step you will have to use rolled thin layers of polymer clay to make stratifications on the tail. This creates an interesting effect of metal plates that are placed one on top of the other. As you can see in the images underneath if you cut and roll into the body the part that will be under the next layer you will avoid the irregularities that can appear. This way the final seahorse will be more accurate. After this step, start forming the ridge by using the metal wires and fix them in the lower part of the back.

Polymer clay Seahorse - DIY step by step tutorial

The details

Right now, if you could find a gear, you place it on the body, close to the middle. Using another thin pressed bundle, you will wrap it around the body going over the gear and between the metal wires. Also, add another layer to distinguish the neck, and another oval one in the place where the eyes will be placed.

Polymer clay Seahorse - DIY step by step tutorial

More details:)

To create the eye, you need to use another gear in which you place a small clay bead. Crush it in the middle with the rounded end of one of the tools (maybe the end of a brush). In the space created you place another smaller bead. So there you have it! Now, for the upper side of the rige you will have to cut small pieces from the metal wire which you will partially wrap in clay. Bake them before you stick them in the upper back of the seahorse. This way they will not be deformed by the pressure of your fingers.

Polymer clay Seahorse - DIY step by step tutorial

Another detail, similar with the eyes, will be made on the gear placed on the body of the seahorse. Use the same tool to create a space over the wrapped gear in the middle of it. You will place in that space a small bead which you will crush again to make a small circle inside the gear. Before the painting process you have to bake the seahorse. You need to bake it as it is required for the type of polymer clay you are using. They always come with instructions, so you can find it all there.

Polymer clay Seahorse - DIY step by step tutorial

The painting

Getting closer and closer to finish with this Polymer clay Seahorse DIY step by step tutorial.
Just some finishing touches and we are there:)

You can start by painting the body then go up to the head and ridge, using a dry brush. To create that texture of the metal you should steer the acrylic paint on a pallet to remove the unnecessary moisture. This way the paint gets more density and gives you the desired result. In the lower spaces, between the wraps on the body you can add some shades. Diversify with red, copper and metallic blue-gray so the seahorse becomes more bright. With a thin brush add some dots over the body and head and bring the seahorse to life.

Polymer clay Seahorse - DIY step by step tutorial

They look just great, aren’t they? This Polymer clay Seahorse DIY step by step tutorial is definitely worth trying.

Polymer clay Seahorse - DIY step by step tutorial

I would love to have a brooch with one of these little ones. How would you guys think to use it?

If you liked this, you can always leave us a comment and don’t forget about our Pinterest page, where you can find more tutorials and ideas.

I found my inspiration for this tutorial here.


######

Best friend photo frame DIY step by step tutorial


Best friend photo frame DIY step by step tutorial

Hello everyone:)

It’s been a while since I have posted a tutorial, but I have found this wonderful best friend photo frame DIY step by step tutorial decorated so nicely which instantly threw me back into my childhood days when this would have been the perfect gift for a best friend. Actually it could be a great gift right now because we all need a dose of pink in our lives to satisfy our inner child. Am I right girls?;)

Since it’s not so difficult to make, this could also be a great project to do with your daughters.

Enough chit-chat! Let’s get started with our Best friend photo frame DIY step by step tutorial:)

To complete this fun project we need these materials:
– Polymer clay : white, fuchsia, beige, black, wasabi green, lilac.
– Tools: clay roller, clay slicer, clay knife, mini heart cutter.
– Other supplies: photo frame, toothpick, clay fast dry glue.

The flowers

Divide the white clay it into 5 parts. Then roll each part to small spheres which will make the petals. The same way you will form the rest of the flowers with different colors and sizes.

The snail and the butterfly

Now, for the snail shell use the lilac clay, shape it as a long cone and roll it.
For the head and body use beige clay. Make a flat oval shape out of white clay and a flat triangle out of lilac clay for the wings of the butterfly which has the same body and head as the snail. After assembling the parts together attach them to the large flowers.

The Details

Use the roller to make a flat thin sheets from the fuchsia clay, then cut little squares. Do the same way with the white clay but this time just to cut little hearts that you will attach together on the snail shell and on the wings of the butterfly.

You can form the eyes from white and black balls and put them on the faces.
For the mouth use a toothpick and make a hole.
Use wasabi green clay to create little leaves and curls to apply on or between the petals.

Use pieces of wire steel to create the feeler and fix them with bake & bond.
At the top of each feeler apply a fuchsia ball.

For the letters form a thin rope from fuchsia clay and cut the necessary pieces to join for the message.

At last, bake the pieces and use the clear fast dry glue to assemble the frame.

So this is the Best friend photo frame DIY step by step tutorial. Pretty awesome right? I have found this great tutorial here.

There are so many ways to decorate photo frames with polymer clay. All you need is good inspiration. You could easily find it in one of my older articles. Either you want to offer them as a gift or to use them for your own photos these are definitely a very unique and funny way to display them.

If you liked my Best friend photo frame DIY step by step tutorial please check and follow my Pinterest page where you can find so many other wonderful ideas.

 
######

Polymer clay Batman step by step tutorial – Super-Heroes

Batman has become a popular character pretty fast. It is the hero of many kids, that’s why I have a special request from a friend of mine to create it for her kid. Actually it’s still my favorite super hero, I sow the movies for many many times! Ok, I’ll admit it, now is running on my second screen :))

I found this nice Batman step by step tutorial that I want to share with you.  It has detailed steps and can be followed easily even for a beginner.

Polymer clay Batman step by step tutorial - Super-Heroes

Ok, ok! This was an easy way to do it. If you want a more real character, bellow you have some photos from deviantart. Ddgcom is the author. I find them amazing and beyond words! Passion make beautiful things! Use it to inspire 🙂

I don’t know about you, but I hope to create one of this detailed Batman.

I find this polymer clay Batman step by step tutorial easy, but I have to admit that I prefer the result of a much more effort! What do you think? Which one do you go for?

You can use this tutorial to create cake toppers from gum paste or you can use polymer clay and create something lasting. If you have kids you can add it as a key-chain and I guarantee that loosing the keys would not be a problem anymore.

Get captivating new tutorials just like this one by following my Pinterest page .
######