Polymer clay funny dog – DIY step by step tutorial
Polymer Clay Funny Dog – DIY Step-by-Step Tutorial
Step 1
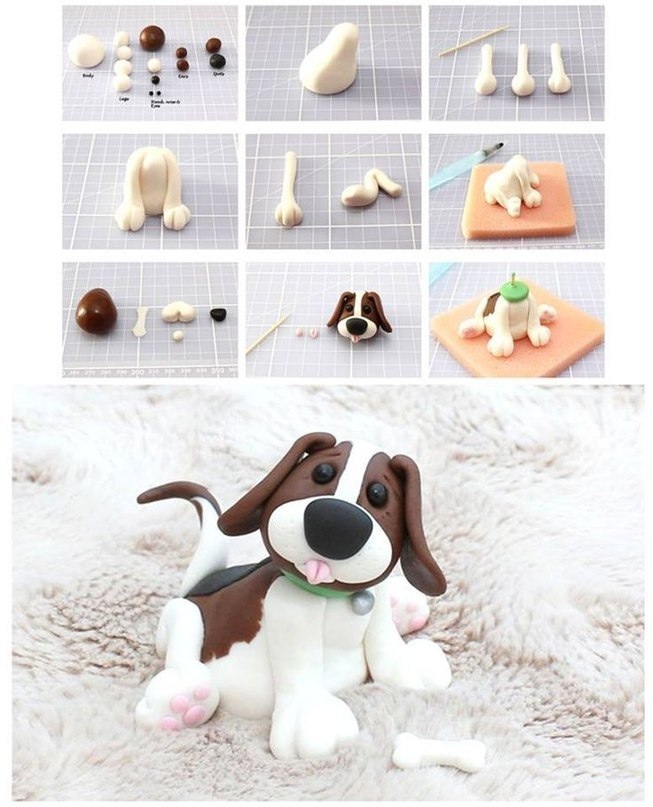
If you’re a dog lover and enjoy crafting with polymer clay, this DIY tutorial is perfect for you! In this step-by-step guide, we will walk you through the process of creating an adorable and funny dog using polymer clay. Get ready to bring a smile to your face as you mold and shape the clay to form your very own canine companion. Let’s get started on this delightful crafting adventure! I’ve found this tutorial here
Materials Needed for polymer clay funny dog creation:
- Polymer clay in desired colors (for the body, ears, and features)
- Clay sculpting tools
- Craft knife or clay blade
- Rolling pin
- Baking tray and oven
- Varnish or glaze (optional)
Step 1: Preparing the Clay Start by conditioning the polymer clay to make it soft and pliable. Knead the clay between your hands until it becomes easy to work with. If needed, warm it up slightly by rolling it between your palms.
Step 2: Shaping the Body Form a ball of clay for the body of the dog. Use your hands to shape and smooth the clay, creating a rounded and slightly elongated shape. This will serve as the base for your funny dog.
Step 3: Adding Features Take smaller portions of clay in different colors to create the facial features of your dog. Mold the clay to form eyes, a nose, and a mouth, giving your dog a comical expression. Attach the features to the body using gentle pressure.
Step 4: Sculpting Ears and Tail Using additional clay, shape two ears and a tail for your dog. Play around with different shapes and sizes to give your dog a unique and amusing appearance. Attach the ears to the top of the head and the tail to the back of the body.
Step 5: Detailing and Texturing Use clay sculpting tools to add texture and details to your funny dog. Create fur texture by gently pressing the clay with a textured tool or by making small indents with a needle tool. You can also add additional details like eyebrows or a tongue for extra personality.
Step 6: Baking and Finishing Place your completed polymer clay dog onto a baking tray and bake it according to the instructions on the clay packaging. Once baked and cooled, you can optionally apply a layer of varnish or glaze to enhance the appearance and provide a protective coating.
Congratulations on creating your own funny dog out of polymer clay! This delightful and whimsical canine companion can be used as a decoration, a gift, or even a playful addition to your crafting projects. Feel free to experiment with different colors, shapes, and expressions to create a whole pack of polymer clay funny dogs. Let your imagination run wild, and enjoy the joy of bringing these adorable creatures to life!
Keep in touch for more polymer clay/ fimo ideas and free step by step do it yourself tutorials! Click here for free dyi fimo/polymer clay tutorials and save the link on your bookmarks because you will definitely want to check it frequently for ideas and inspiration.
Until next time I wish you all to be creative! I’m always open to suggestion, please leave a comment. Your opinion is valuable for me.
Don’t forget to follow my Pinterest page. It’s the best way to keep updated with free polymer clay tutorials and clay ideas to increase your creativity.