Polymer clay heart tutorial

We are surrounded by love all the time, whether it comes from a lover, a friend or family. Today I will show you a short tutorial on how to create a polymer clay heart. It might be one of the simplest tutorials, but I can assure you that it will have a great impact. It looks very cute and you can use it in further
creations such as jewellery or decorations.

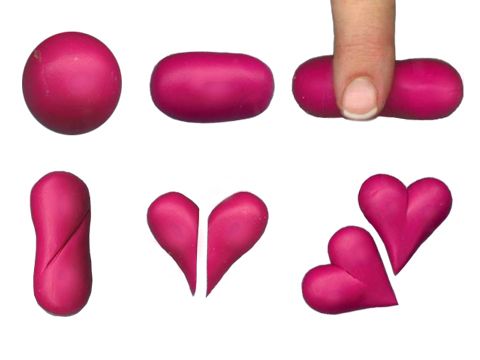
In order to model the heart you will only need dark pink (or red) polymer clay.

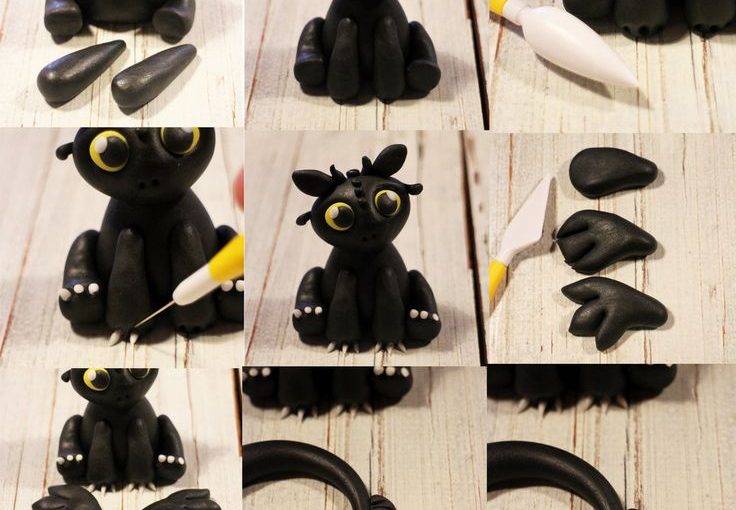
First, you need to shape the polymer clay into a ball. Then give it a cylindrical shape. Now that you have it,
cut it into two symetrical pieces. Give them a proper half-of-heart shape and now stick them together.
Here is your lovely polymer clay heart. You can create as many as you want!

Polymer clay heart tutorial

I know the tutorial was a short one, so I will suggest you some ideas where you can use the polymer clay heart.
Be aware that its usage depends on its size.
For instance, you can use it as a pendant, just place it onto a necklace. If you feel up to create many of them,
you can also use them as earrings. Your friends will love them and will definitely ask for a pair. Who says you can’t
add the polymer clay heart on your ring? It will be a heart-made one ;).

If we think about the decorative side, you can add some glue on the back of the polymer clay heart and stick it on your photo
frames, on your laptop, on your phone case, or wherever you want to feel loved :).

These were just a few ideas, feel free to be as creative as you can.

I’ve found my inspiration here

For more tutorials like this one, take a look on my Pinterest page.
######

Polymer clay baby dragon tutorial

Today I will show you how to create a tiny black polymer clay baby dragon! I’ve found it suitable for Halloween decor or for your children’s room decor.
You can also teach your little ones how to make their own little black baby dragons, so that you will enjoy some quality time with them!

For this polymer clay baby dragon tutorial you will need:

-black, white and yellow polymer clay
-a cutter
-a ball-shaped modelling tool

Polymer clay baby dragon tutorial

Step 1:

Shape the black polymer clay into an oval, but make sure that you make its base flat. This will be the dragon’s body.

Step 2:

Continue by shaping the dragon’s legs. You will need two black polymer clay tiny shapes, which you will stick to the body.
Then, you will sharpen them on the front side and after that, you will turn them into flat areas, so that you will be able to
place the polymer clay baby dragon’s paws onto them later.

Step 3:

Shape some black polymer clay into a flattened oval (just like in the collage). Use the ball-shaped modelling tool to create
two tiny holes into the oval. Use the yellow polymer clay to make two little flattened balls, which you will place into the holes.
Then, create even tinier black flattened balls, which you will add onto the yellow ones. In order to create a more realistic effect, add
some white polymer clay on the top of the black balls. These will be the polymer clay dragon’s eyes.

Step 4:

You will now need to shape two tiny rounded diamonds, using the black polymer clay. Also, cut some thin strips that you will add onto
the dragon’s head. This is how you create its ears and also a realistic effect for its fur.

Step 5:

Shape two thin triangles from the black polymer clay. Add them on the front side of the dragon’s body. These will represent its tiny arms.

Step 6:

Shape the baby dragon’s paws! You will need four of them. Make sure to use really tiny pieces of the white polymer clay in order to create
the baby dragon’s little claws. Add them onto the paws. (Check the collage for a more specific view!)

Step 7:

Make it fly! Use the black polymer clay to shape two wings for your cute baby dragon. Use the cutter give them a proper look.

Step 8:

Last but not least, the tail. Create a black polymer clay long strip and add a semi-oval piece of polymer clay on its end.

If you feel inspired, accesorize your dragon baby with a scarf or a bow, using colourful polymer clay. It is easy to make and it will definitely
give your house a spooky atmosphere for Haloween!

I’ve found my inspiration here

Feel free to find more tutorials like this one on my Pinterest page !
######

Polymer clay flower cane tutorial

Hi there! Today I will show you how to create your own polymer clay flower cane to use it in your future projects. I personally find it extremely special and I’ve already found a couple of uses for it. You can either slice it in tiny pieces, so you can create fancy jewellery out of it, or use it as a whole for your house decoration. It’s up to you!

But first things first, let’s check the ingredients we need in order to create the polymer clay cane!

– white, black, purple and orange polymer clay

Polymer clay flower cane tutorial

Polymer clay flower cane tutorial


Step 1: Shape the polymer clay into shapes of different sizes, so that it will be easier to model it

Step 2: Model the purple polymer clay ball into a cylinder and the orange one into tinyer cylinders. The
white polymer clay will be chaped into flat parallelipipeds. All these are needed to offer the cane a tridimmensional shape.

Step 3: Use the orange and the white polymer clay to create the flower’s filament. Place them into the purple polymer clay, then wrap it
up with the black one, so that you will get a more realistic effect.

Step 4: Compress the cane with your hand and stop when you get the wanted size of it. This will also depend on the amount of
polymer clay you use!

Step 5: Steps 2-4 represent just one petal. Repeat them five more times, so you will have a number of six petals. Also, you have to create the center of the flower. In order to do this, you will need a white cylinder-shaped polymer clay.

Step 6: Gather all the petals around the white cylinder, in order to get the flower shape. Last, but not least, wrap it up with white polymer clay.

Voile! Here is your cute polymer clay floral cane! There is a bit more work to do, but I guarantee that the final result is worth it! Me and my
friends love it! Do you find any other use for these canes? 🙂

I’ve found my inspiration here

For more tutorials like this, follow my my Pinterest page !!
######

Polymer clay peony tutorial

Spring is here and we all love to be surrounded by its beauties! Today I was wondering how it would be to enjoy them indoors as well,
so I bring to you a polymer clay peony tutorial! I hope you’ll enjoy it and that it will help you in your future projects!

As you’ve got used, we start with the tools needed:

– green and white polymer clay
– simple pins
– golden headed pins
– scissors
– heart shapers
– ball shape modelling tool

Step by step method:

Step 1: Firstly, use some of the white polymer clay and shape it into a drop. Use the scissors to cut its top into two bifurcations. Then add on its sides the golden
headed pins. These will represent the poymer clay peony’s anthers. Use the white polymer clay to create a flowerpot as well.
Shape it like a cylinder!

Step 2: Note: If you don’t have heart shapers like those from the collage, you can use a cutter. Use the green polymer clay to create the peony’s petals. Flatten it,
then cut it into various heart shapes.

Step 3: Place each petal onto a simple pin. Give the petals a “wavy” effect by using the ball shape modelling tool.

Step 4: Add each petal onto the white polymer clay “drop” you created at Step 1 and then put the final result onto the white polymer clay flowerpot.

And voile! Here is your own polymer clay peony! It is easy to make and the result is delightful and always ready to bring spring back in your home!

Polymer clay peony tutorial

I found my inspiration here !

What do you think? I would definitely try this polymer clay peony in red!It will look amazing! If you tried this tutorial and want to share your result pleas add a comment.

For more tutorials like this one, follow my Pinterest page !
######

Polymer clay duckling tutorial

Today I’ve thought about making a tutorial that will cheer you up, so I’ve decided to show you how to make your own cute polymer clay duckling!
They are adorable and you can use them to decorate your children’s room, they would love them!
Besides, the polymer clay duckling is incredibly easy to make. Let’s have a closer look!

First of all, the “ingredients“:

– yellow, orange, black and white polymer clay
– a ball shape modelling tool
– a cutter

Step 1 ~ Head and body: Shape two pieces of yellow polymer clay: an oval one (the duckling’s body) and a round one (its tiny head).

Step 2 ~ Mouth & nose: You will need now a piece of the orange polymer clay. Shape it into a flattened pyramid and add it onto the head.
Use the cutter to give the duckling a
cute smile. Then use the ball shape modelling tool to press on the pyramid you’ve previously made, so that it will turn into the duckling’s
mouth. You can use a toothpick to drill the upper side of the orange polymer clay – this will be the nose.

Step 3 ~ Eyes: Use the ball shape modelling on the polymer clay duckling’s head to shape its eyes. Use the black and white polymer clay to create small
balls. Place the black ones on the inner side of the shaped circles you’ve made at Step 2. Then add the white ones onto them.

Step 4 ~ Legs: Make two small balls using the orange polymer clay. Press onto them and then cut two semi-circles on the left and right side
on both of them. These will be the duckling’s legs. Add them at the bottom of the ducling’s body.

Step 5 ~ Wings: Use the yellow polymer clay and shape the duckling’s wings. Add them on its body sides.

Polymer clay duckling tutorial

And here you have your very own polymer clay duckling! It is easy to make and the children will love it!

I’ve found my inspiration here! 🙂

For more tutorials like this one, follow my Pinterest page!

 
######

Polymer clay bunny tutorial

As Easter is approaching, I’ve decided It’s a great time for a polymer clay bunny tutorial. Your children will definitely enjoy having your house decorated with these!
You can also teach them how to make their own, as this DIY bunny is extremely easy to make. This way you will spend quality time together crafting.
The polymer clay bunny is also an interesting and cute gift for your loved ones.

Let’s start learning how to create it step by step!

For this type of polymer clay bunny you will need:
-beige, pink, black and white polymer clay
-a toothpick
-glue
-a cutter

1st picture: You can see all the ingredients needed.

2nd picture: Model the beige polymer clay into a cone – this will be the bunny’s body.

3rd picture: Add two smaller beige balls to the bottom of the body and press them to it – here you will attach the bunny’s paws (6th picture)

4th picture: Use the white polymer clay (or any lighter colour you have) for the bunny’s fur, in order to create a “fluffy-effect” on
its belly.

5th picture: Make two small beige balls and then press them – these will be the bunny’s paws

6th picture: Use the white polymer clay and make: 2 small balls and 6 smaller balls; press them and then add them on the result from
the 5th picture – here you have the final version of the paws

7th picture: Add the paws to the small balls from the 2nd picture

8th picture: Shape the bunny’s superior paws using the cutter

9th picture: Place the paws on the bunny’s body; add the toothpick in the middle of the body, so you can place the bunny’s head onto it

10th picture: Make a beige polymer clay ball; add a pink polymer clay triangle in the middle of it; surround it with the white
peanut-shaped polymer clay; use another toothpick to drill the white side and to make a tiny hole under it – this will be the bunny’s mouth.
Shape two lengthy beige polymer clay and add a slim white polymer clay in the middle of each – these will be the bunny’s ears

11th picture: Place the head on the bunny’s body and then add on the ears.

12th picture: Use the black polymer clay to make tiny balls; place them on the head – these will be the bunny’s little eyes.

Polymer clay bunny tutorial

And voila! You’ve just created your very own bunny!  I found my inspiration here .

I find this polymer clay bunny tutorial easy to follow and the result is adorable!

For more tutorials like this one, follow my Pinterest page!
######