Polymer clay poppy flower tutorial
Hello everyone! Hope you finished your projects because you can’t miss this one: the polymer clay poppy flower tutorial! I declare it the most detailed polymer clay poppy flower tutorial! And believe me with the last statement because I have a weakness for poppies. My latest acquisition is a black bag embroidered with poppies <3 <3 <3 <3 <3 <3 <3 <3
Use this step by step polymer clay poppy flower tutorial to improve your technique.
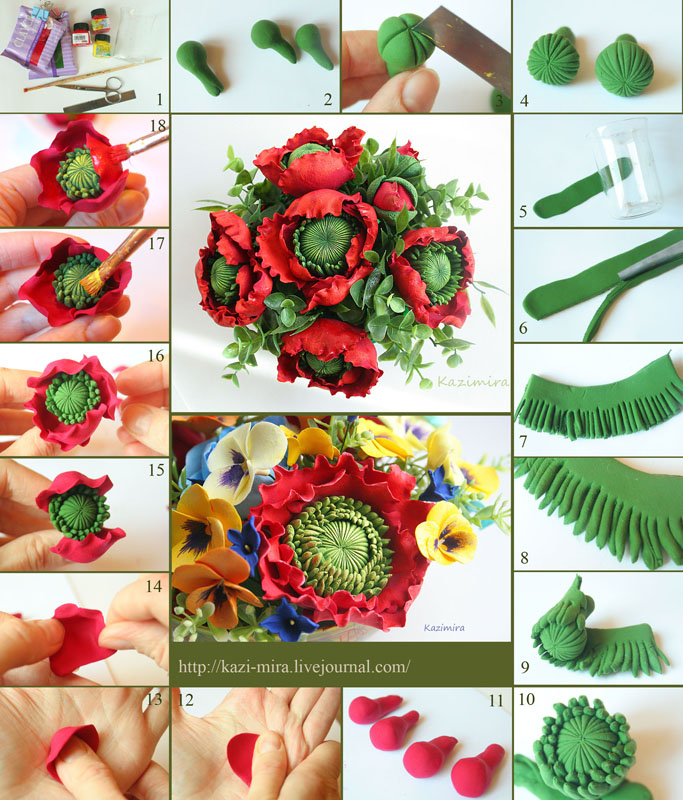
Floral motifs are very popular in polymer clay, but the way Catherine Zverzhanskaya of Moscow surprise the great little details of poppies is amazing!
1. Tools you need for this polymer clay poppy flower tutorial
– red and green polymer clay
– knife-blade
– scissors
– brush
– varnish
– rolling pin or glass
2. make small balls on the leg of green polymer clay
3. press the strip with the blade
4. this will be the middle of the poppies
5. roll out a strip of green plastic
6. cut off the edge
7. cut the edge with scissors
8. rounded-up arms
9. – 10. wrap the middle of the poppy
11. make droplets of red polymer clay – these are the future petals
12. smear a little bit on the palm
13. lightly press to shape
14. let’s “curl” the edges of the petals
15.-16. attach the petals to the core and bake
17.-18. you can use varnish to obtain the glow
I hope you enjoyed this step by step polymer clay poppy flower tutorial!
You may consider following my Pinterest page to get updates on free fimo diy tutorials.
######