Polymer clay dangle wisteria flower earrings – free DIY step by step tutorial
We continue the learning series with polymer clay dangle wisteria flower earrings tutorial. If the name of the flower does not mean ring a bell then picture all those amazing purple japan gardens.
This earrings with wisteria that we will learn to make today will be a great handmade gift proper for any occasion!
For creating this polymer clay dangle wisteria flower earring we will need:
– polymer clay white, light purple, lilac, plum color;
– Artistic pastel of violet and light green color;
– jewelry pins;
– jewelry studs;
– connecting rings 0,5 cm;
– small beads of lilac color;
– chain (link 3x2mm);
– a cutter;
– Flat brush;
– a flat stack;
– rounded tool;
– asponge;
– round nose pliers with pliers;
– foil;
– roller for polymer clay;
Method:

Step 1:
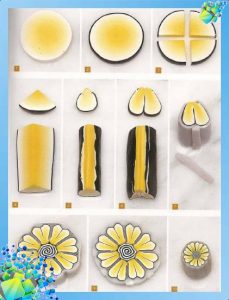
We’ll start forming the inside flower. Take a small lilac ball and put it on the eye of the jewelry pin. Cover the eye, give the clay an oval shape and then flatter it. Repeat the process for 21 more times because every earring has 11 flowers.
Step 2:
We’ll continue with small purple petals and we’ll need some light violet clay. For each flower we will need 2 petals, that means 44 in total. Roll a small oval from the clay and use your fingers to flatten it. Apply the violet pastel on one edge of each petal. Put these petals on the sponge with the colored side down. At the top, work them out in a circular motion with a rounded tool. Now, to each lilac core, attach 2 violet petals that you just created.
Step 3:
As a next step we’ll make light petals. You need to mix up some white clay with a small piece of violet. Blind out the petals of a pear-shaped form.On the upper (wide) edge of the petals, apply a little violet pastels and on the lower edge of the petals, apply a brush a little pastels of light green color. We now have to glue the light petals. Take one petal and tie it with a narrow end to the base of the core with the violet petals.
Step 4:
From the same clay we made the small violet petals we’ll form the buds. To do this, put a piece of clay on the eye of the pin and give it the same shape as the lilac inner part of the flower. Repeat the process for five more times because we’ll need six of these buds. Their ends can be toned with a purple pastel.
Step 5:
To make the sepals cut a piece of clay and roll it into a thin layer. Cut out a long strip and use a cutter to cut out really small triangles from one edge of the layer. Then grind the layer in many pieces. This will be the sepal and you need to glue them to the base of the bus.For the last step before baking we have to twirl loops on flowers and buds.You can also attach a number of beads between flowers but be carefully to match the colors.
I hope you enjoyed this polymer clay dangle wisteria flower earrings tutorial!
The result of this polymer clay dangle wisteria flower earrings tutorial it will give your wardrobe a unique style. What would you were with? If you need more details you can find the original tutorial here.
Of course it will look amazing in any color combinations! If you have a pasta machine and you want something a little bit more sophisticated you should try making the flowers using this blended sheets technique.
By following my Pinterest page you will get updates on free polymer clay tutorials and new ideas regarding polymer clay creations.
Thank you for visiting! If you are interested in more free polymer clay tutorials click this link.
To share on pinterest you may consider using this photo:
######