Polymer clay horse – DIY step by step tutorial
Polymer Clay Horse – DIY Step by Step Tutorial
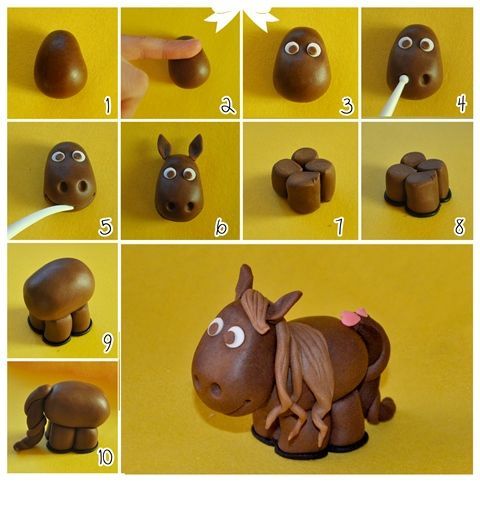
In this polymer clay horse DIY tutorial, we will learn how to create from scratch a clay horse. Horses are majestic creatures, and with a little creativity, you can bring their elegance to life in clay form. I’ve found this step by step polymer clay horse photo tutorial on the page of an amazing cake decorator, check the page here
Step 1
So let’s gather our materials and get started on this exciting sculpting project!
Materials Needed for a polymer clay horse:
- Polymer clay in colors of your choice (brown, black, white, etc.)
- Clay sculpting tools
- Wire or armature for support (optional)
- Oven and baking tray
Step 1: Reference Images
Begin by collecting reference images of horses to guide you during the sculpting process. These images will help you capture the anatomy and characteristics of a horse accurately.
Step 2: Creating the Base
Start by shaping the body of the horse using brown clay. You can either use a solid piece of clay or create a wire armature for added stability. Shape the body, legs, and head, ensuring that the proportions are correct.
Step 3: Sculpting the Details
Using smaller pieces of clay, add details to the horse’s face, such as the eyes, ears, and nostrils. Sculpt the mane and tail, giving them a flowing and realistic appearance. Pay attention to the muscle structure and contours of the body to create a lifelike representation.
Step 4: Adding Texture and Patterns
Use clay sculpting tools to add texture and patterns to the horse’s coat. Create hair-like textures on the mane and tail, and add realistic details such as muscle definition and hooves. Be patient and take your time to achieve the desired results.
Step 5: Baking and Finishing your polymer clay horse
Place your horse sculpture on a baking tray and follow the instructions on your polymer clay package for baking. Once cooled, you can further enhance the sculpture by applying a coat of varnish to protect the clay and give it a glossy finish.
Congratulations! You have successfully created a stunning polymer clay horse sculpture. This beautiful piece can be displayed as a standalone art piece or used in various craft projects like jewelry, keychains, or home decor. Let your creativity run wild and explore different ways to showcase your clay horse.
Keep in touch for more polymer clay/ fimo ideas and free step by step do it yourself tutorials! Click here for free dyi fimo/polymer clay tutorials and save the link on your bookmarks because you will definitely want to check it frequently for ideas and inspiration.
Until next time I wish you all to be creative! I’m always open to suggestion, please leave a comment. Your opinion is valuable for me.
Don’t forget to follow my Pinterest page. It’s the best way to keep updated with free polymer clay tutorials and clay ideas to increase your creativity.