Polymer clay puppy book sign
Polymer Clay Puppy Book Sign
If you’re a dog lover and a book enthusiast, why not combine your passions with a polymer clay puppy book sign? In this DIY tutorial, we’ll guide you step by step on how to create an adorable puppy-shaped book sign using polymer clay. I’ve found my inspiration here
Materials you’ll need:
- Polymer clay in desired colors (brown for the puppy, assorted colors for details)
- Craft knife
- Rolling pin
- Clay sculpting tools
- Alphabet stamps or clay cutters (optional)
- Baking tray and oven
Step-by-step instructions:
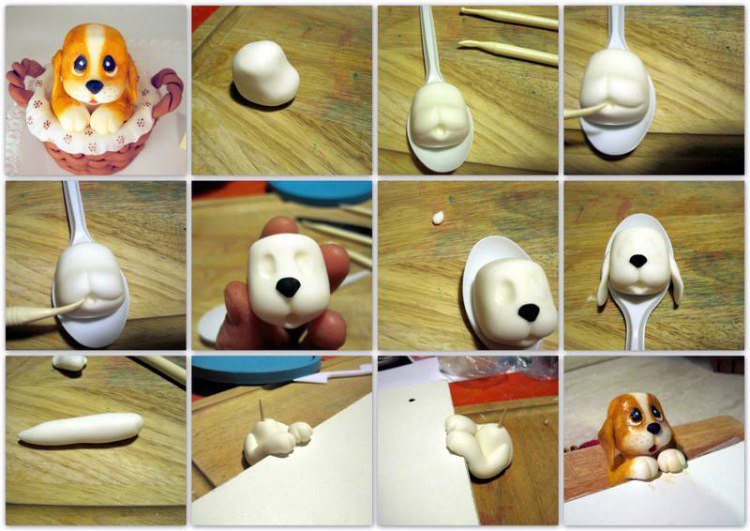
- Start by conditioning the polymer clay. Knead it in your hands until it becomes soft and pliable.
- Roll out the brown clay into a flat sheet using a rolling pin. Aim for a thickness of about 1/8 inch.
- Use a craft knife to cut out a rectangular shape for the book sign. Smooth the edges with your fingers or a clay tool. This part would be attached to the front paws
- Now it’s time to shape the puppy! Take a small portion of the brown clay and form it into a rounded head shape. In the photo tutorial the author is working with white, but for me it is easier to work with colored clay than to paint it after is baked
- Roll two smaller balls of brown clay and shape them into ears. Attach them to the top corners of the puppy’s head.
- Use additional clay to create the puppy’s facial features. Make two small balls for the eyes, a tiny triangle for the nose, and a curved line for the mouth. Attach them carefully to the puppy’s face.
- Next step on the list is to create the neck and paws and to attach the head to them. You can use a toothpick and liquid fimo to keep them from falling apart.
- Use clay sculpting tools to add texture and details to the puppy’s fur, such as fur lines or paw prints. If desired, you can use alphabet stamps or clay cutters to add a message or the title of your favorite book to the sign.
- Now you need to attach the puppy to the sheet created on step 3.
- Preheat your oven according to the instructions provided by the polymer clay manufacturer. Place your puppy book sign on a baking tray and bake it for the recommended time.
- Once the clay has cooled, you can give your puppy book sign a final touch by applying a thin layer of glaze for a glossy finish.
- Now you have a delightful polymer clay puppy book sign to mark your favorite pages and bring a smile to your face as you read.
Keep in touch for more polymer clay/ fimo ideas and free step by step do it yourself tutorials! Click here for free dyi fimo/polymer clay tutorials and save the link on your bookmarks because you will definitely want to check it frequently for ideas and inspiration.
Until next time I wish you all to be creative! I’m always open to suggestion, please leave a comment. Your opinion is valuable for me.
Don’t forget to follow my Pinterest page. It’s the best way to keep updated with free polymer clay tutorials and clay ideas to increase your creativity.