Polymer clay pion shaped rose – DIY step by step tutorial

Polymer polymer clay pion shaped rose tutorial

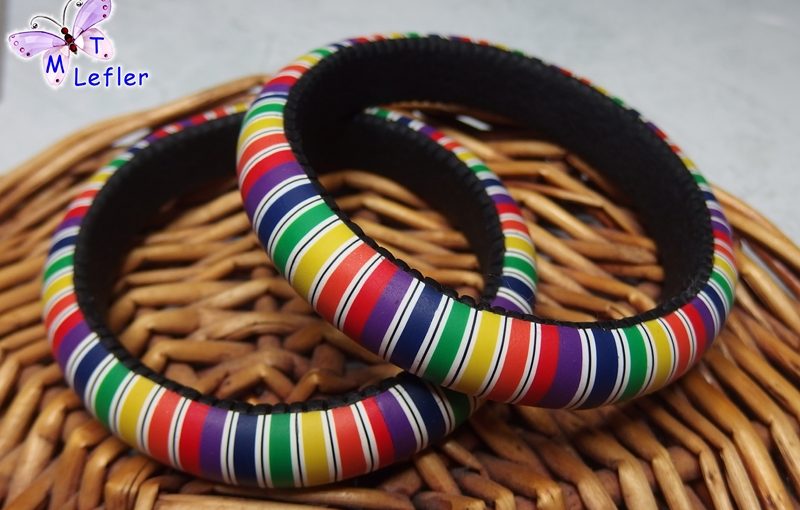
Capture the timeless beauty of a pion-shaped rose with polymer clay. Roses are often associated with love and romance, and their intricate petal arrangements make them a favorite subject for artists and crafters. In this step-by-step tutorial, we will guide you through the process of creating a pion-shaped rose using polymer clay. Let’s dive in and bring the elegance of this classic flower to your crafts! I’ve found this photo tutorial here

Polymer clay pion shaped rose - DIY step by step tutorial

Materials Needed for polymer clay pion shaped rose:

  • Polymer clay in various colors (for petals, center, and leaves)
  • Clay sculpting tools
  • Flower petal cutters or templates
  • Rolling pin
  • Baking tray and oven
  • Varnish or glaze (optional)

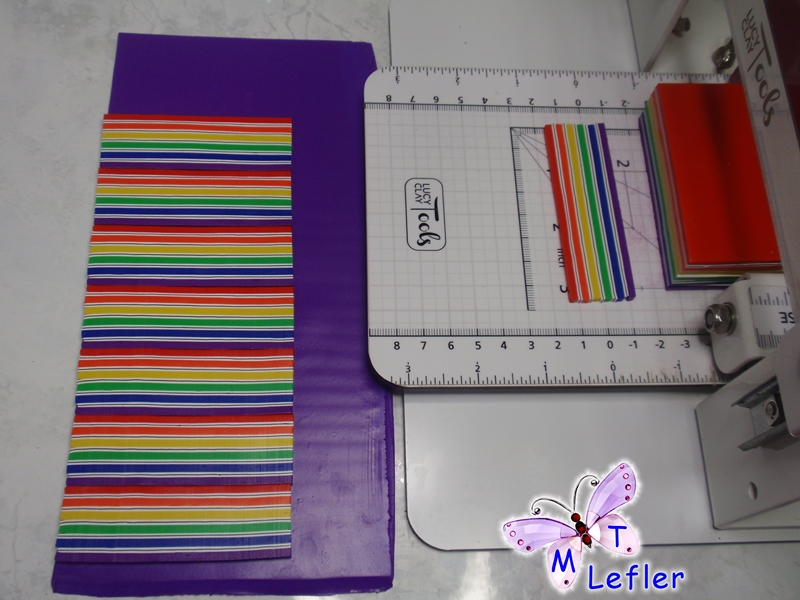
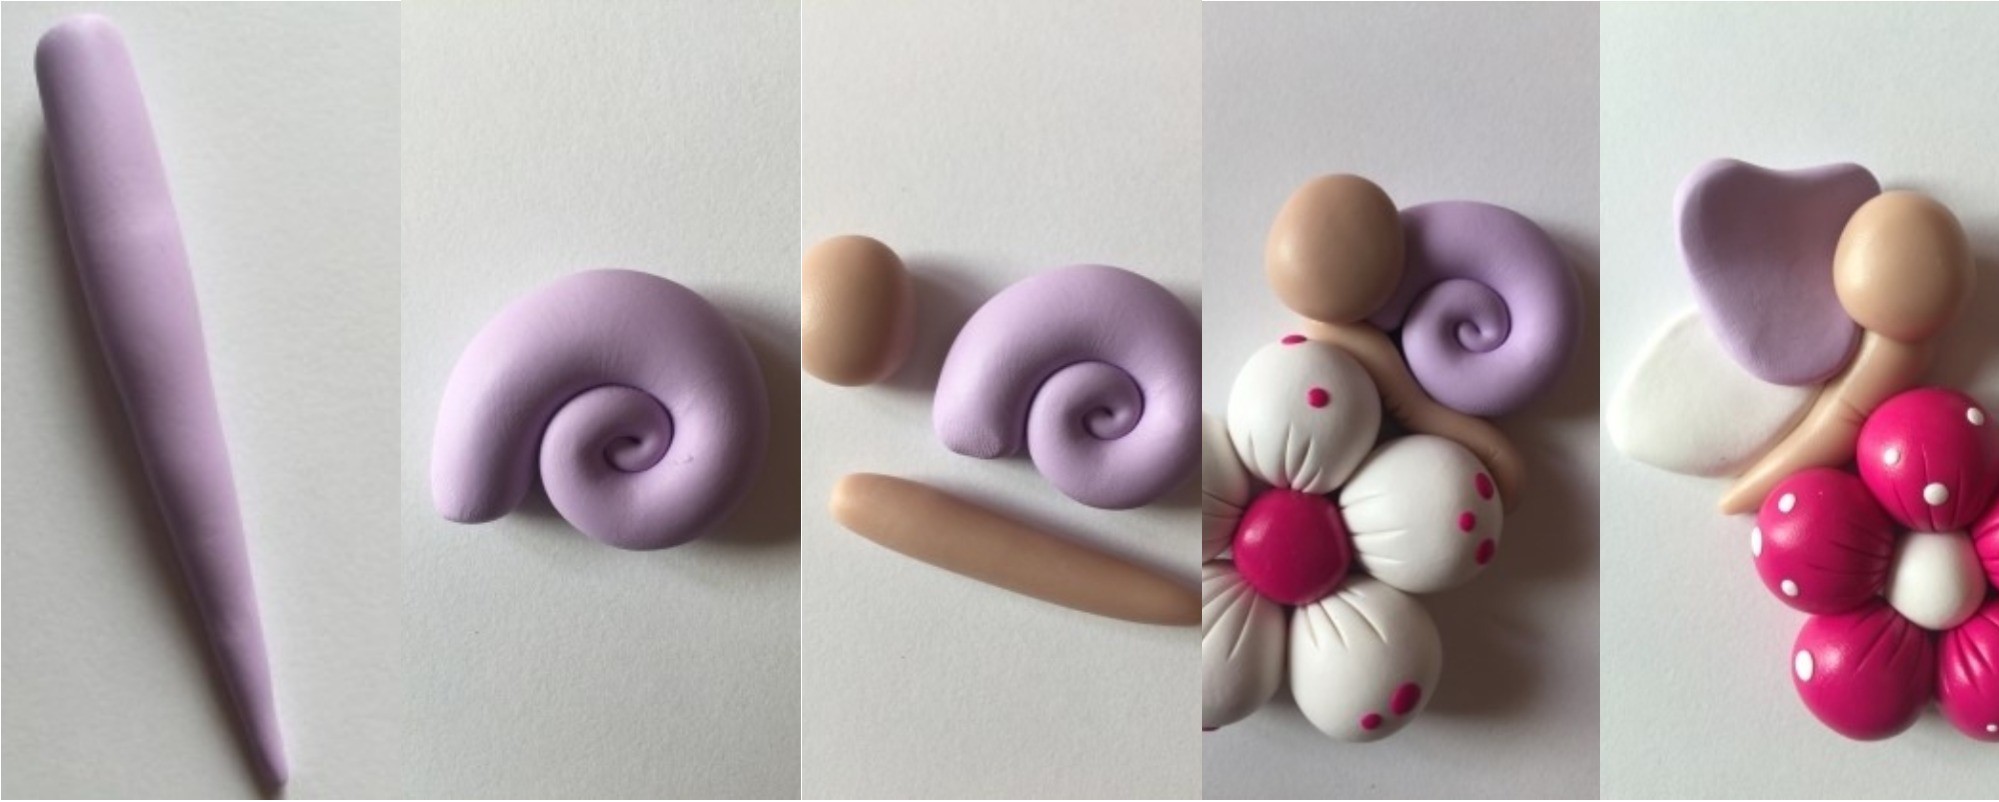
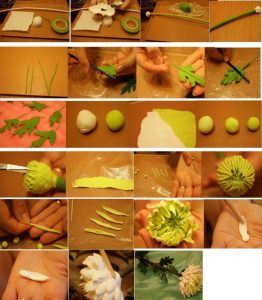
Step 1: Conditioning and Shaping the Clay Begin by conditioning the polymer clay, kneading it until it’s soft and pliable. Roll out the clay to a uniform thickness using a rolling pin. Choose the colors you want to use for the petals, center, and leaves.

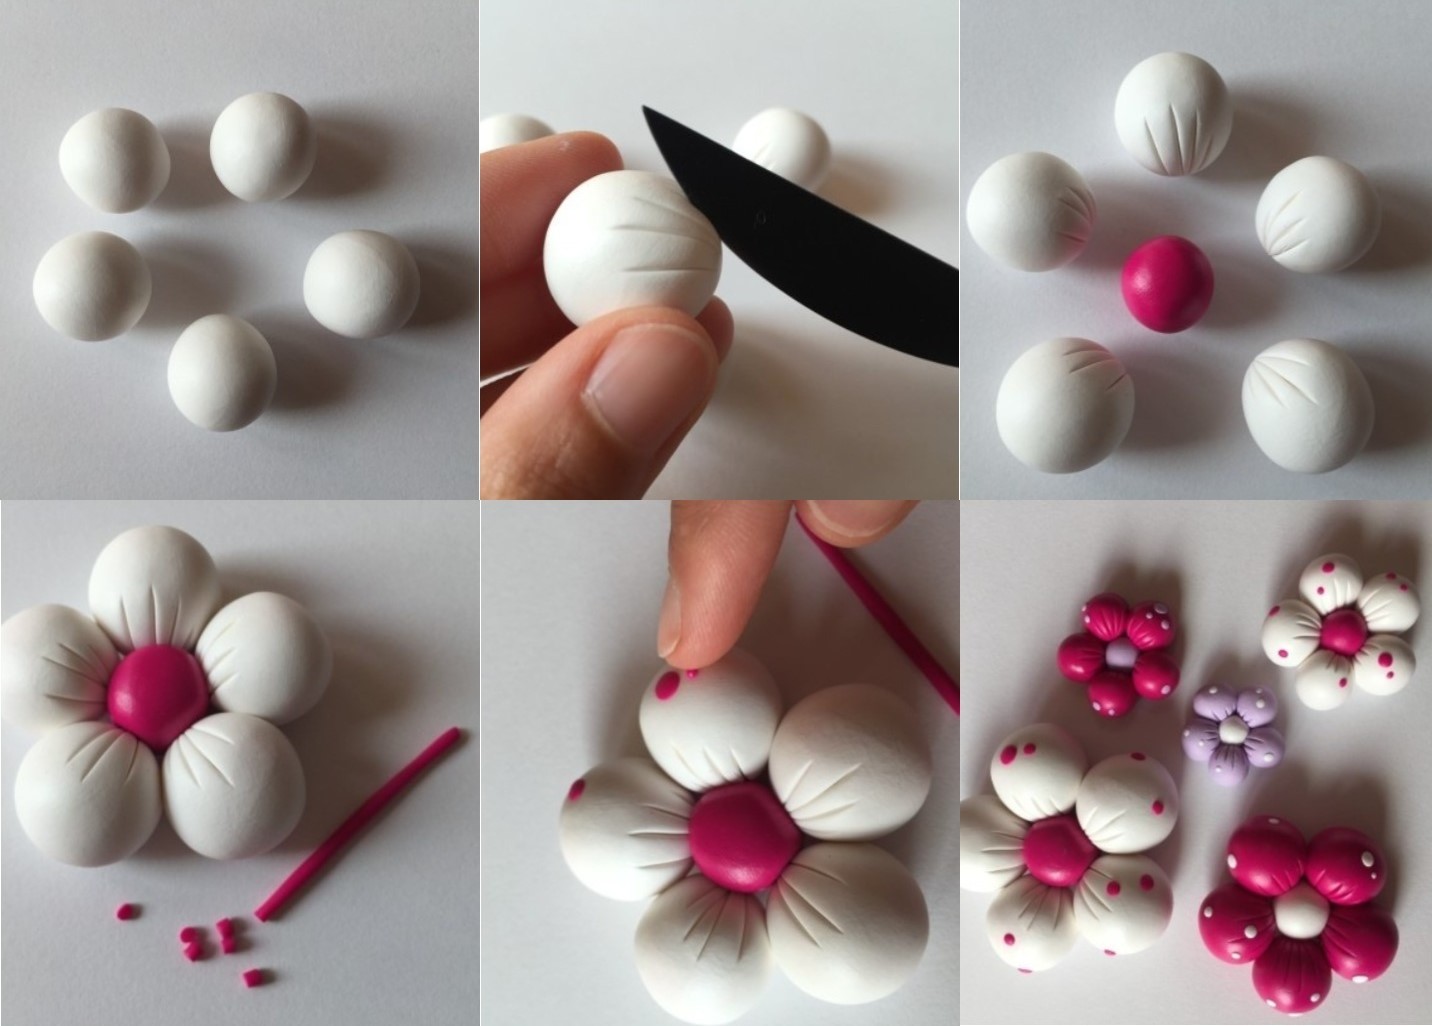
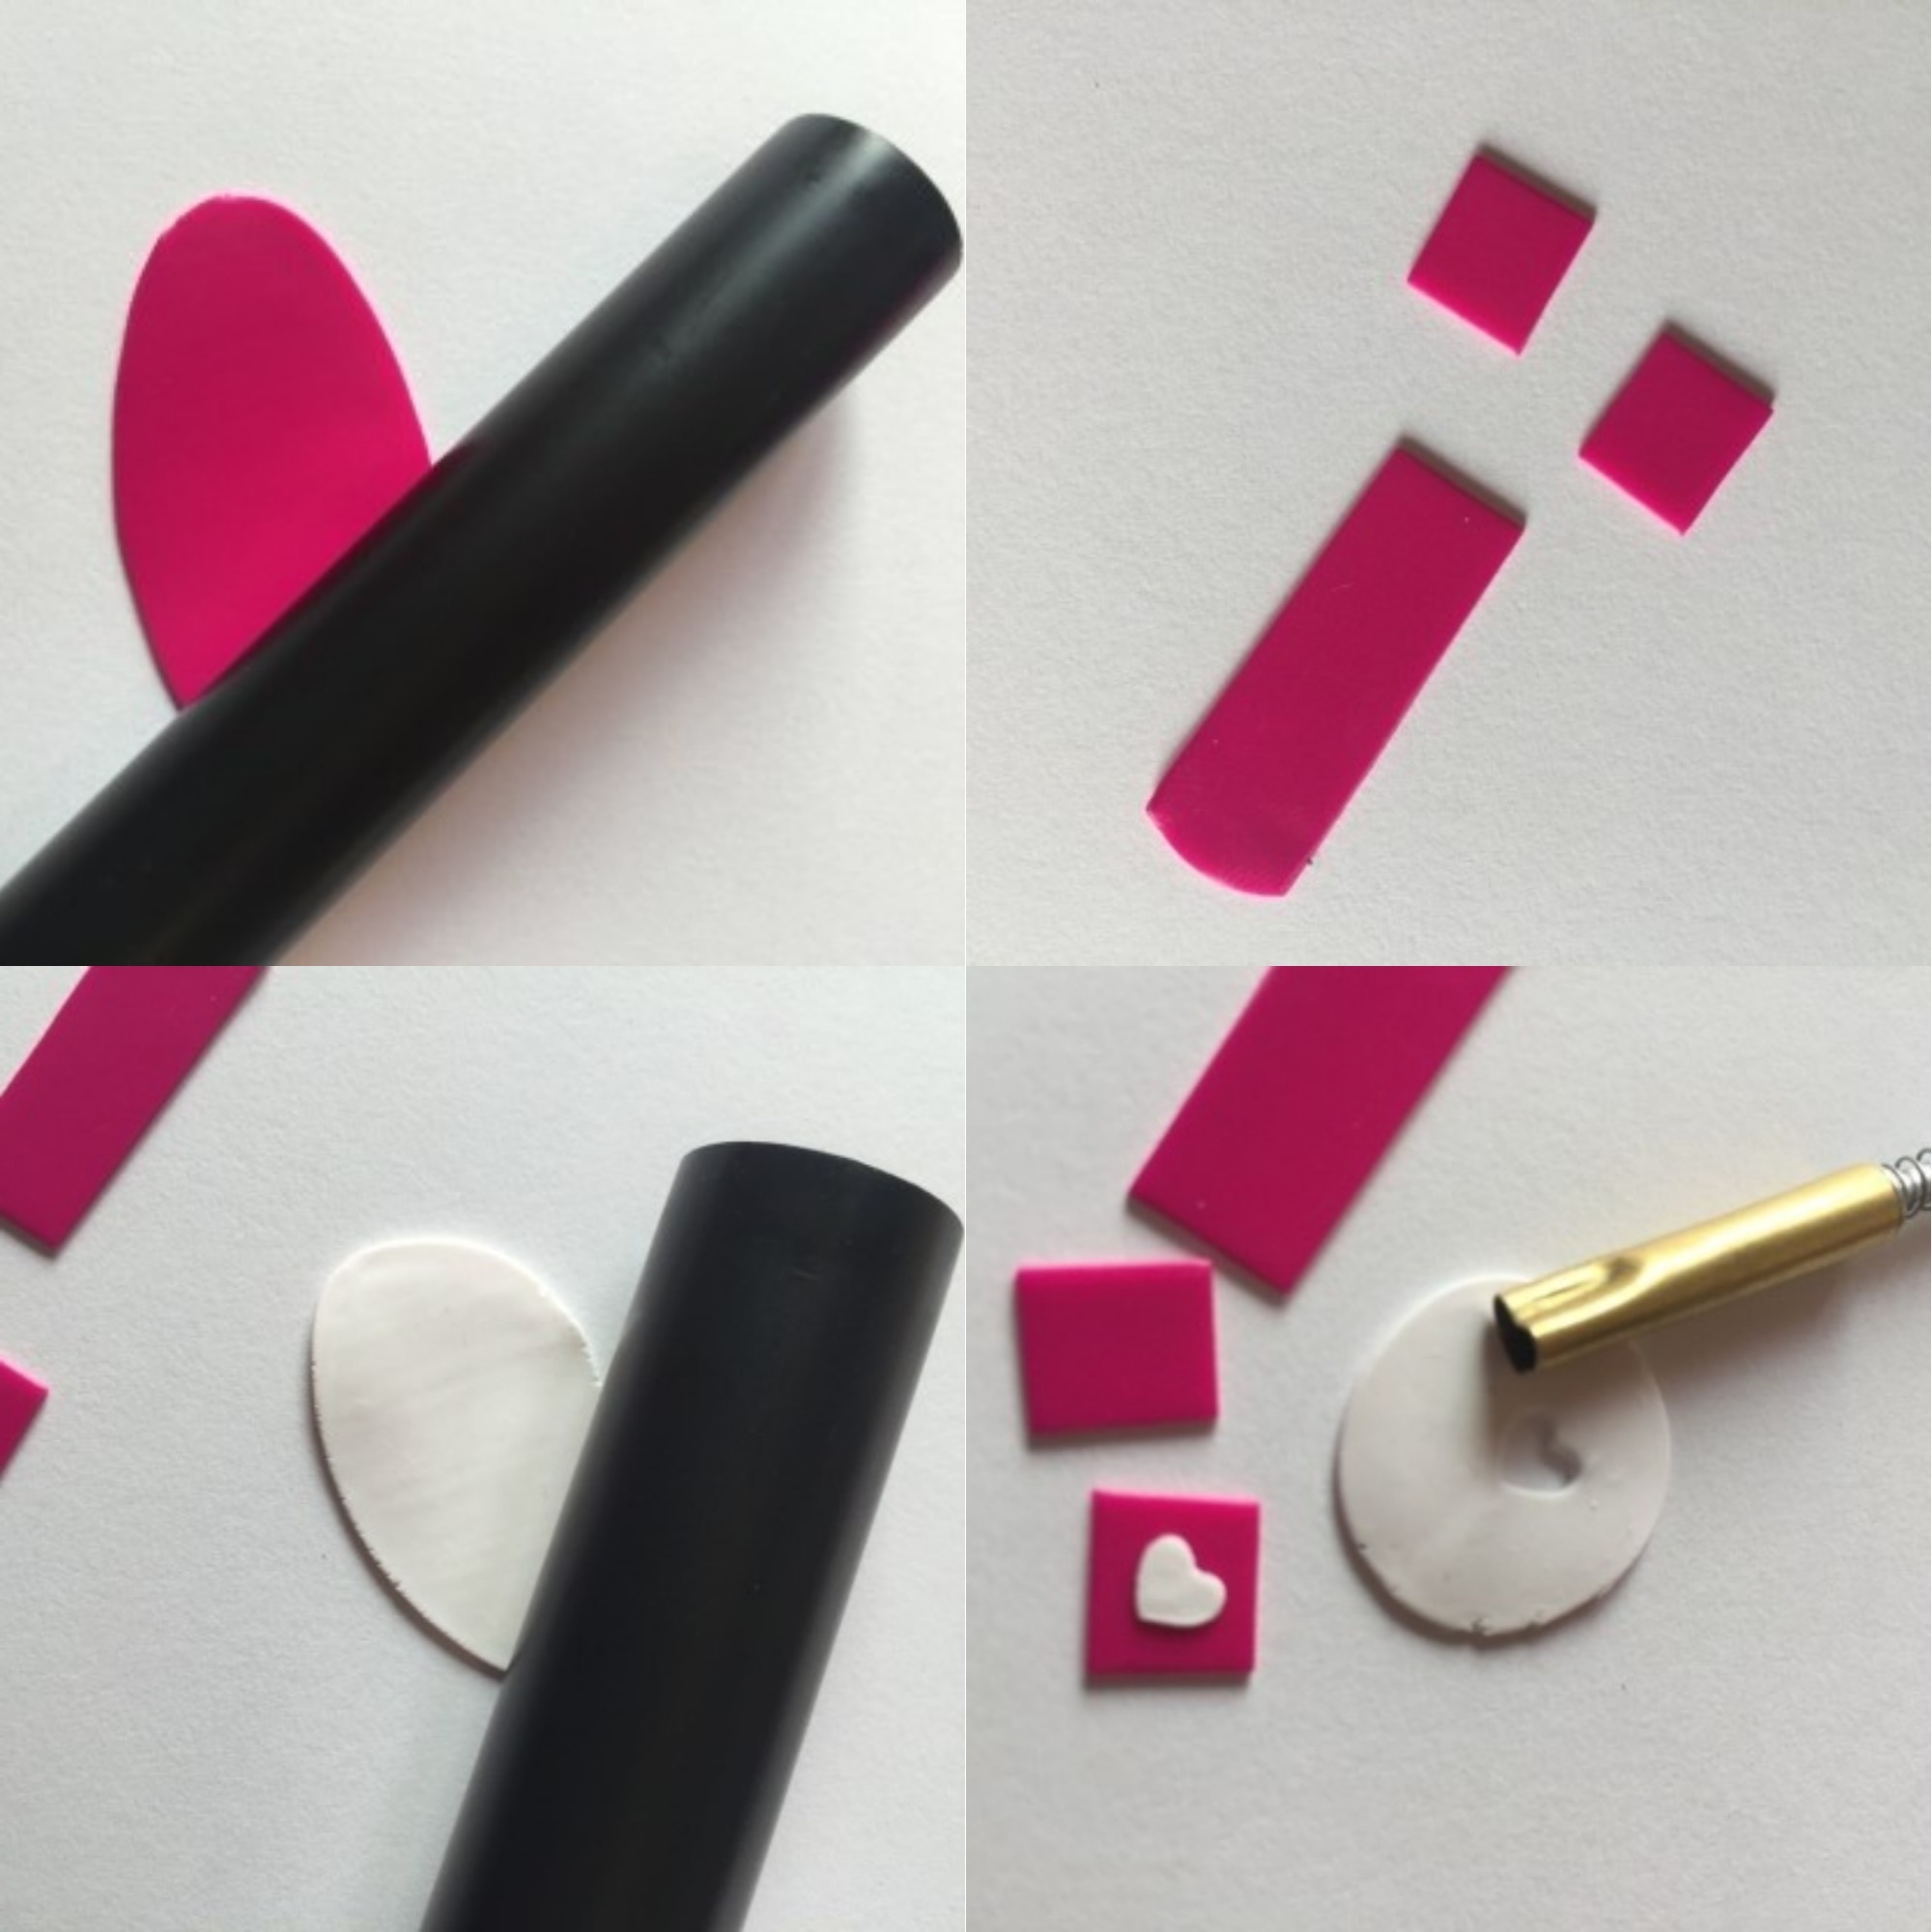
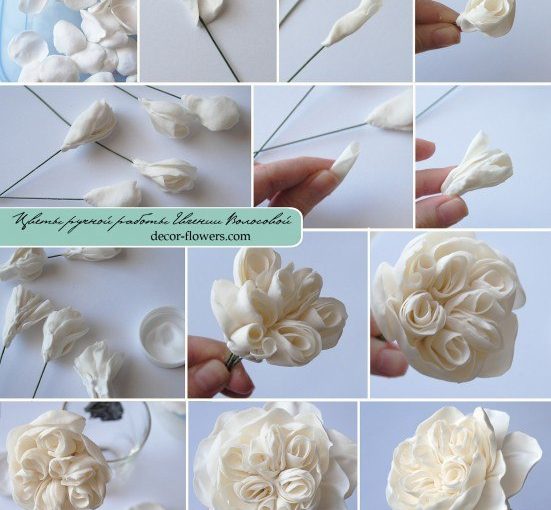
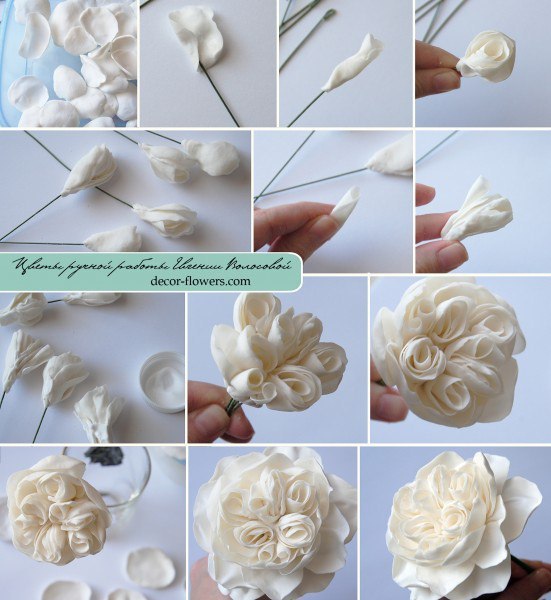
Step 2: Shaping the Petals Using flower petal cutters or templates, cut out petal shapes from the colored clay. Use clay sculpting tools to add texture and details, such as veins and ruffled edges, to the petals. Repeat this process to create multiple petals in different sizes.

Step 3: Creating the Center Form a small ball or cylinder shape using a contrasting color of clay for the center of the rose. Use your fingers or tools to shape and texture the center, adding depth and realism.

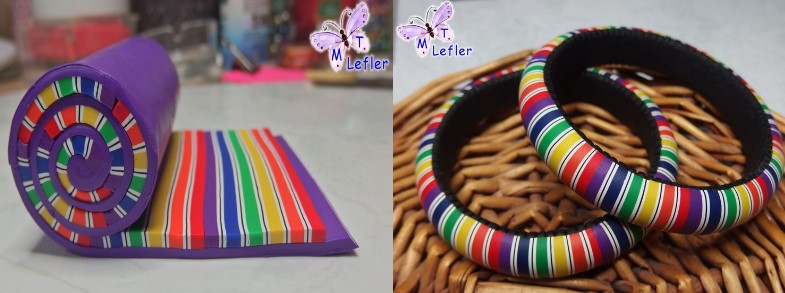
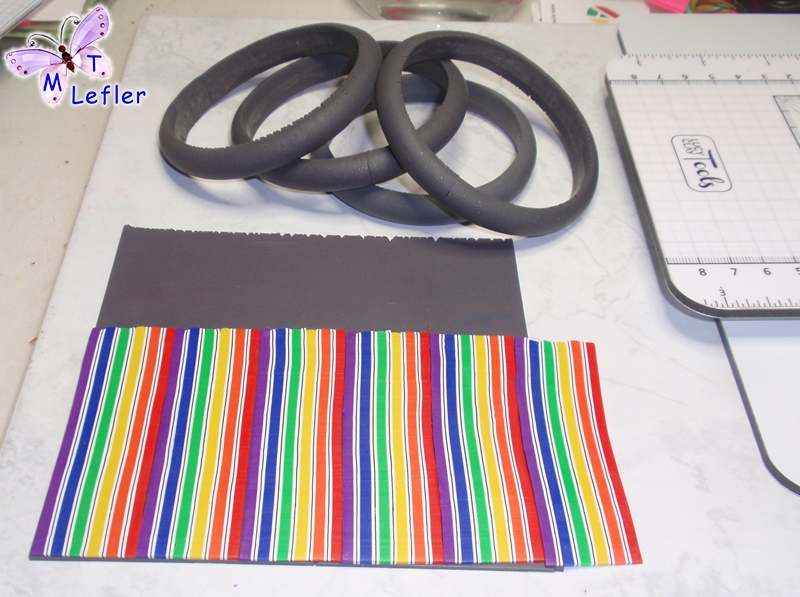
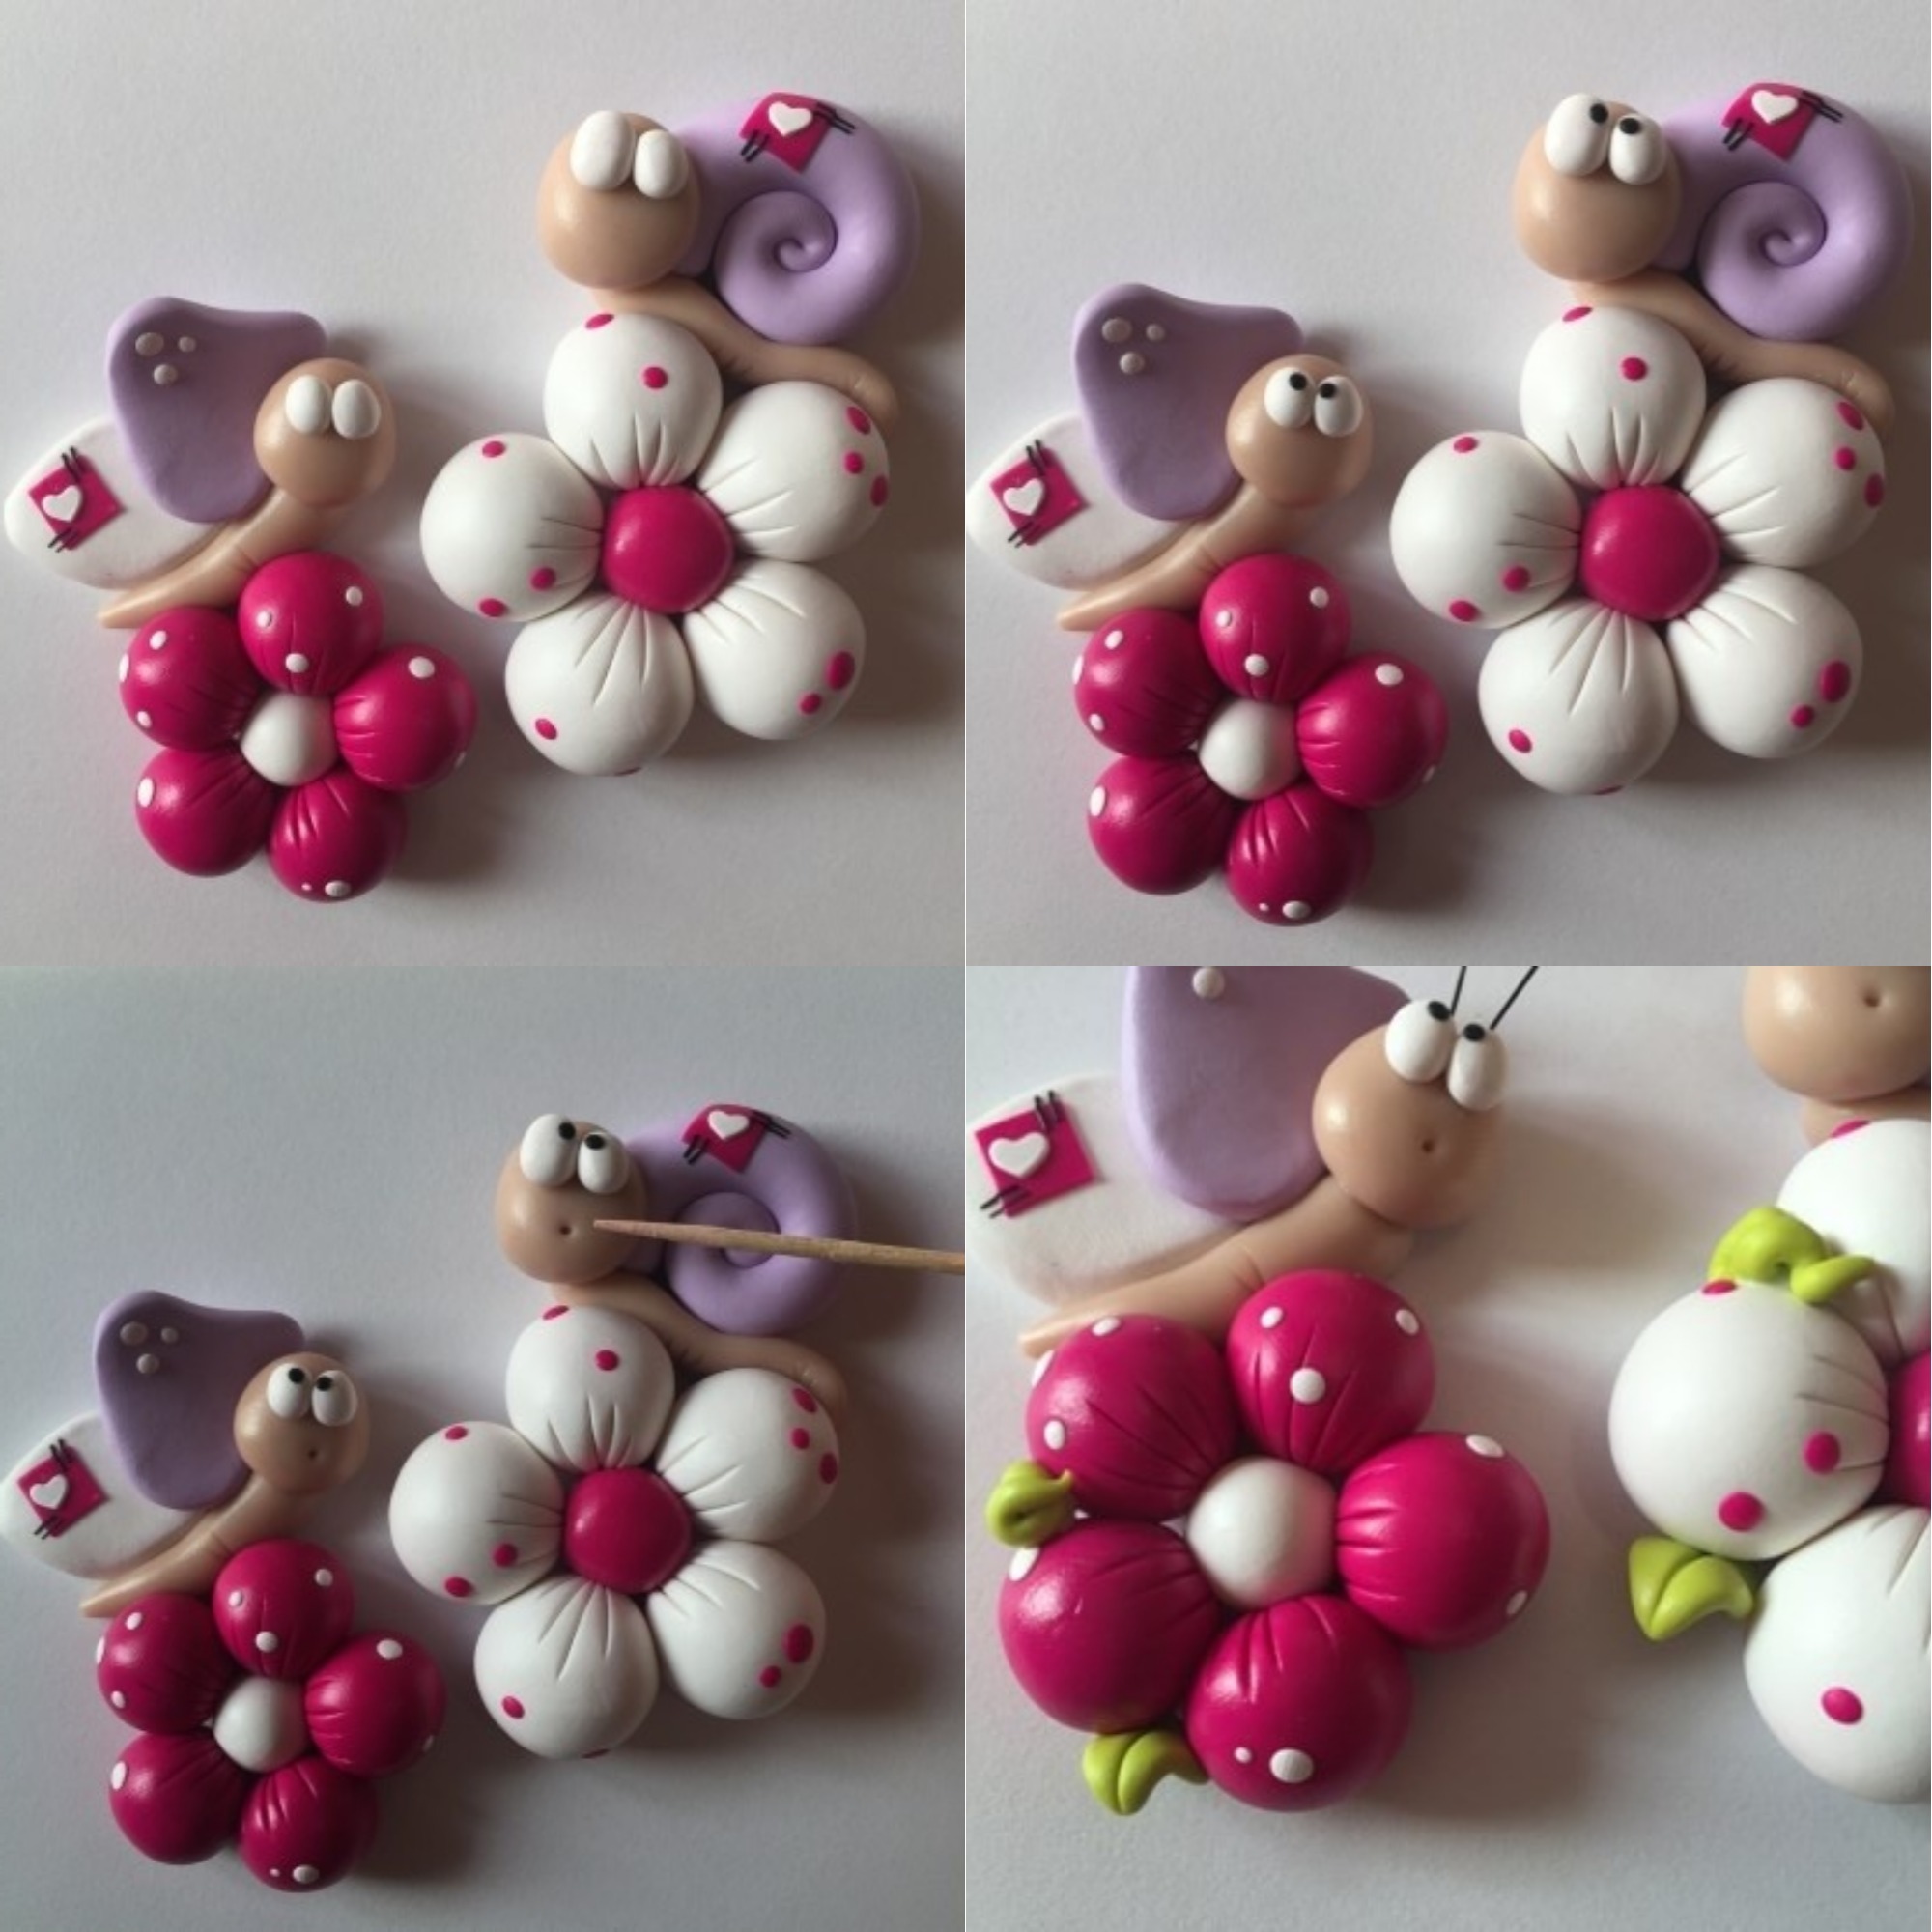
Step 4: Assembling the Rose Start by attaching the smallest petals around the center, slightly overlapping them to create a bud-like appearance. Gradually add larger petals, layering them and positioning them in a spiral pattern. Gently press and blend the clay together to secure the petals.

Step 5: Adding Leaves Roll out green clay and cut out leaf shapes using leaf cutters or templates. Attach the leaves to the stem or base of the rose, positioning them as desired. Use clay tools to create veins and texture on the leaves.

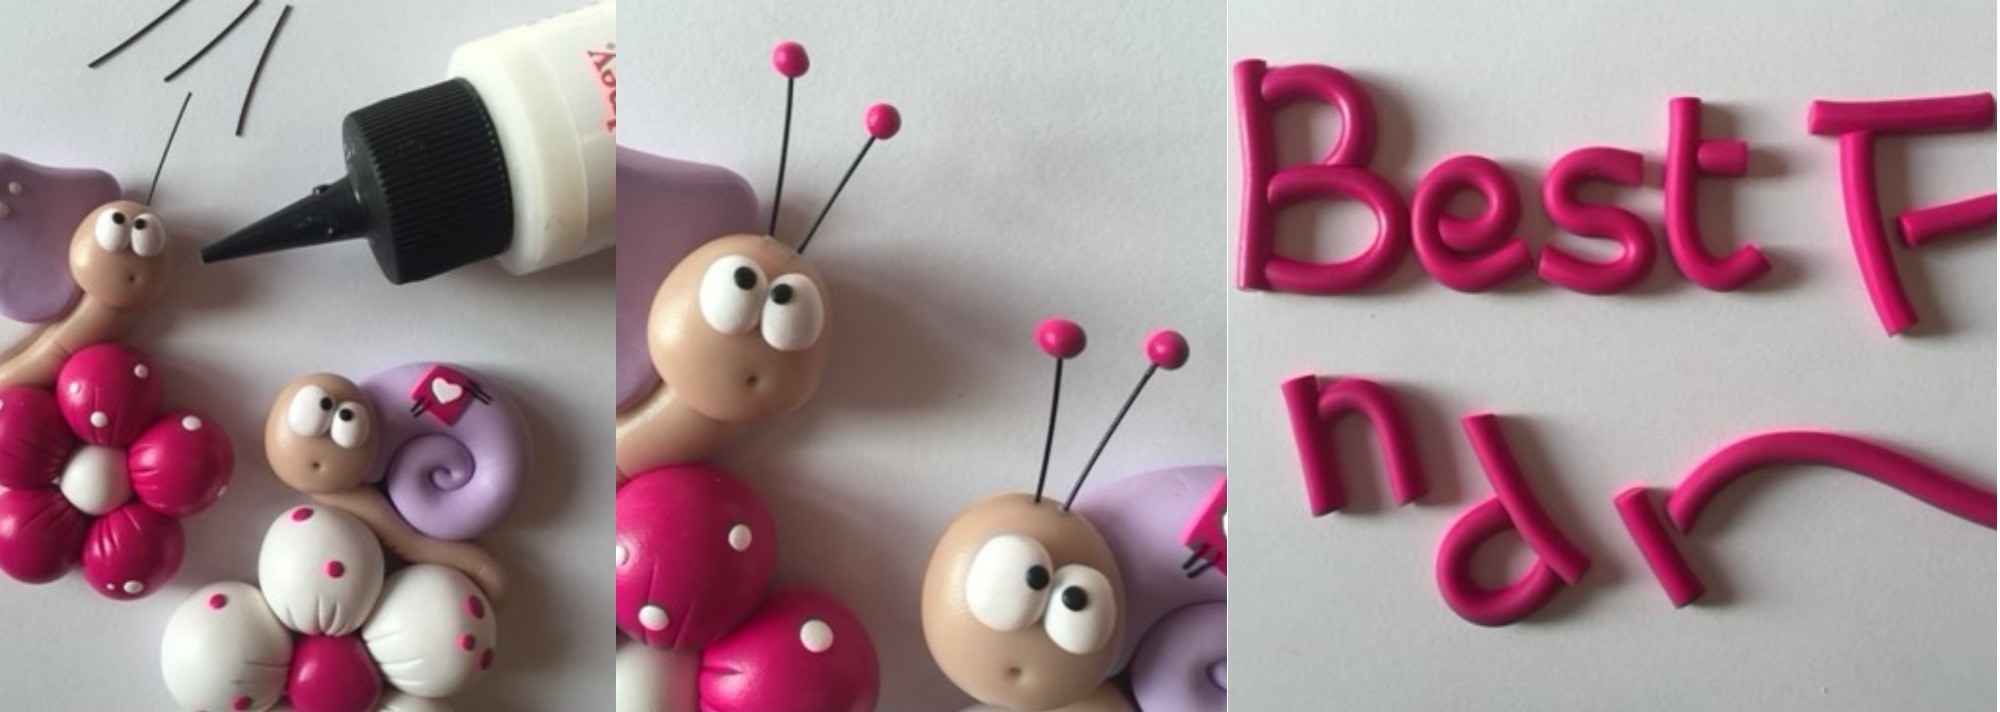
Step 6: Baking and Finishing Carefully transfer the rose onto a baking tray and follow the manufacturer’s instructions for baking. Once the clay has cooled, you can add a layer of varnish or glaze to enhance the shine and protect the finish.

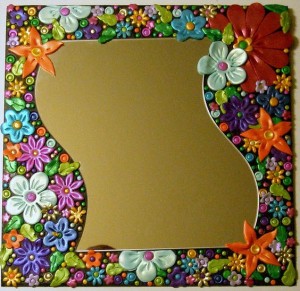
Congratulations! You have successfully created a beautiful polymer clay pion shaped rose. This versatile flower can be used in various craft projects, including jewelry, home decor, and floral arrangements. Experiment with different colors and sizes to create your own unique rose designs. Enjoy the process of working with polymer clay and let your creativity bloom!

Keep in touch for more polymer clay/ fimo ideas and free step by step do it yourself tutorials! Click here for free dyi fimo/polymer clay tutorials and save the link on your bookmarks because you will definitely want to check it frequently for ideas and inspiration.

Until next time I wish you all to be creative! I’m always open to suggestion, please leave a comment. Your opinion is valuable for me.

Don’t forget to follow my Pinterest page. It’s the best way to keep updated with free polymer clay tutorials and clay ideas to increase your creativity.

Polymer clay rainbow cane bracelet tutorial

Polymer clay rainbow cane bracelet tutorial

Today i was inspired by this polymer clay rainbow cane bracelet tutorial which is actually pretty interesting to make.

We all admire people that stand out trough their appearance, so when it comes to unique statement pieces that really can make a difference in an well planned outfit we just have to have as many as possible.

It is even more interesting when you can say that you have made that catchy accessory just by following the steps from this Polymer clay rainbow cane bracelet tutorial.

Here we go!

What you will need:
– polymer clay: white, red, orange, yellow, green. blue, purple and gray.
– tools: clay slicer, clay conditioning machine

Step 1

Polymer clay rainbow cane bracelet tutorial

At first I will show you how to make a simple rainbow cane. Use the purple clay to form a generous thin sheet in a rectangular shape.

Do the same with the other polymer clay colors and place the sheets one on top of the other in the order of a rainbow, as you can see in the image above. You can use white polymer clay also to place between the colored sheets. This way the rainbow effect can be more intense.

Use the clay slicer to cut through the colored bulk that you have built sheet by sheet so you will get some rectangular sheets that contain all your colors. Place them one next to another over the purple sheet.

Step 2

Polymer clay rainbow cane bracelet tutorial

For this step we can actually begin with our polymer clay rainbow cane bracelet tutorial.

You need to prepare ahead the molds for the bracelet, out of a clay color of your choice, and that will be the color of the sheet that you will place under the rainbow. In order to obtain a smooth sheet you need to use a clay conditioning machine.

Polymer clay rainbow cane bracelet tutorial

Now you will have to cut skinny slices out of the smooth sheet of rainbow clay just enough to be placed on the bracelets molds. Remove the extra edges, place them on a tray and bake them 15 to 20 minutes at the temperature recommended for the clay you are using.

Step 3

Polymer clay rainbow cane bracelet tutorial

All that is left now is to place the lining of your choice on the interior and that’s it. Enjoy your new bracelets!

The cane

Polymer clay rainbow cane bracelet tutorial

Now, I will teach you how to create a cane from the leftovers. And it’s simpler than you think, all you have to do is twist. Before you start rolling the colorful sheets make sure you leave some space between the layer formed from the clay colors and the purple one underneath. Good. Now that know how to make a beautiful rainbow cane and I’m relay curious how will you use. Feel free to comment and add your creations 🙂

So what do you guys think about this polymer clay rainbow cane bracelet tutorial? Hopefully you will try it pretty soon:) I found this tutorial here.

Fell free to check out some other cool ideas and tutorials on my Pinterest page.
######

Best friend photo frame DIY step by step tutorial


Best friend photo frame DIY step by step tutorial

Hello everyone:)

It’s been a while since I have posted a tutorial, but I have found this wonderful best friend photo frame DIY step by step tutorial decorated so nicely which instantly threw me back into my childhood days when this would have been the perfect gift for a best friend. Actually it could be a great gift right now because we all need a dose of pink in our lives to satisfy our inner child. Am I right girls?;)

Since it’s not so difficult to make, this could also be a great project to do with your daughters.

Enough chit-chat! Let’s get started with our Best friend photo frame DIY step by step tutorial:)

To complete this fun project we need these materials:
– Polymer clay : white, fuchsia, beige, black, wasabi green, lilac.
– Tools: clay roller, clay slicer, clay knife, mini heart cutter.
– Other supplies: photo frame, toothpick, clay fast dry glue.

The flowers

Divide the white clay it into 5 parts. Then roll each part to small spheres which will make the petals. The same way you will form the rest of the flowers with different colors and sizes.

The snail and the butterfly

Now, for the snail shell use the lilac clay, shape it as a long cone and roll it.
For the head and body use beige clay. Make a flat oval shape out of white clay and a flat triangle out of lilac clay for the wings of the butterfly which has the same body and head as the snail. After assembling the parts together attach them to the large flowers.

The Details

Use the roller to make a flat thin sheets from the fuchsia clay, then cut little squares. Do the same way with the white clay but this time just to cut little hearts that you will attach together on the snail shell and on the wings of the butterfly.

You can form the eyes from white and black balls and put them on the faces.
For the mouth use a toothpick and make a hole.
Use wasabi green clay to create little leaves and curls to apply on or between the petals.

Use pieces of wire steel to create the feeler and fix them with bake & bond.
At the top of each feeler apply a fuchsia ball.

For the letters form a thin rope from fuchsia clay and cut the necessary pieces to join for the message.

At last, bake the pieces and use the clear fast dry glue to assemble the frame.

So this is the Best friend photo frame DIY step by step tutorial. Pretty awesome right? I have found this great tutorial here.

There are so many ways to decorate photo frames with polymer clay. All you need is good inspiration. You could easily find it in one of my older articles. Either you want to offer them as a gift or to use them for your own photos these are definitely a very unique and funny way to display them.

If you liked my Best friend photo frame DIY step by step tutorial please check and follow my Pinterest page where you can find so many other wonderful ideas.

 
######